Sending PHP Single-Page Application Logs to Loggly
In this post, we’ll embark on the journey of building a simple PHP single-page application that interacts with a MySQL database. We’ll integrate logging functionality on top of our application. Logging is a crucial aspect of any application—for providing insights into user behavior, tracking errors, and monitoring performance.
We’ll start by walking through how to set up our application. Then, we’ll cover the steps of integrating logging and sending those logs to Loggly®.
An introduction to our application
Our PHP application is a basic user management system. In our underlying database, we have a single table of users. Each user has a username, first name, last name, and email address. The web UI for our application initially displays a list of usernames. When you click on a single username, you see the remaining details for that user. You can also click on an icon to delete a user. Lastly, there is a form for adding a new user.
The front end of the application is made up of a single HTML page and a JavaScript file. We’ll use JavaScript to send Ajax requests to backend PHP scripts for business logic and data processing. Our front end will also depend on jQuery for basic DOM manipulation and Ajax functionality, and we’ll use Materialize for styling.
We’ll build and run our application locally, serving our application with NGINX.
Following along as we build this application
The entire codebase for this project is available through this GitHub repository. As we work through building this demo project, we will only highlight some parts of the code, to give you a clear but simplified understanding of how we put this application together. We’ll focus more on the details for adding logging and showing the power of logging to an external log management platform like Loggly.
We built this application on a machine running Ubuntu 20.04.6 LTS. We used PHP 8.1, NGINX 1.18.0, MySQL 8. If your local development environment is similar, make sure to install the php8.1-fpm, php8.1-mysql, and php8.1-curl.
For logging capabilities, we also installed Composer 2.7.1 and used it to install Monolog 3.5.0.
To send your logs to Loggly, you will need a Loggly account. You can sign up for free and use the free Lite tier which offers enough features to follow this demo.
With these preliminaries out of the way, we’re ready to start building!
Build our web application
Our web application is made up of several components—database, PHP, HTML, and JavaScript. We’ll walk through the most significant parts.
Set up the database
In MySQL, we created a database called php_loggly. Then, we created the simple users table and seeded it with data. After you’ve created your database, you can use the files in the data subfolder of the codebase to set it up.
~/project/data$ mysql -h localhost -u root -p \
                 php_loggly < create_schema.sql
~/project/data$ mysql -h localhost -u root -p \
                 php_loggly < create_records.sql
Create constants.php file
Our project also has a file called constants.php, where we’ll store all our credentials and secrets. Of course, as a security best practice, this file is not checked into the repository. You can use constants.php.example for the starter template for this file.
<?php
define('DB_HOST', 'localhost');
define('DB_USERNAME', 'root');
define('DB_PASSWORD', 'REPLACE ME');
define('DB_NAME', 'php_loggly');
define('LOGGLY_TOKEN', 'REPLACE ME');
Connect to the database (db.php)
Most of our backend PHP scripts will need to connect to the MySQL database. To make this process more convenient, we will create a utility file (db.php) that can be easily included.
<?php
include_once 'constants.php';

try {
  $conn = new mysqli(DB_HOST, DB_USERNAME, DB_PASSWORD, DB_NAME);
} catch (Exception $e) {
  $error = "Connection failed: " . $e->getMessage();
  die($error);
}
Get all users (get_users.php)
Next, we create our first backend script, get_users.php, which will fetch the usernames from the database and return the array in JSON format. Our script is simple:
<?php
include_once 'db.php';

$sql = "SELECT username FROM users ORDER BY lower(username)";
$result = $conn->query($sql);

$rows = array();
while ($row = $result->fetch_assoc()) {
  $rows[] = $row;
}

$conn->close();
echo json_encode($rows);
We can test our script from the command line:
~/project$ php get_users.php

[{"username":"Adonis.Renner42"},{"username":"Adrian.Donnelly57"},{"username":"Blair_Farrell20"},{"username":"Carson.Frami38"},{"username":"Christop.Konopelski"},{"username":"Cletus_Gleichner40"},{"username":"Constance91"},{"username":"Creola.Wintheiser"},{"username":"Daren_Marks"},{"username":"Davin.Heidenreich"},{"username":"Deven96"},{"username":"Dimitri.Feeney"},{"username":"Ebba.Jerde55"},{"username":"Elliot6"}, … {"username":"Zoie_Moore"}]
It works!
Build the frontend
Our front end is mainly composed of a basic HTML page (index.html) and a JavaScript file (app.js) where we handle all of the user actions and Ajax requests. Our index.html page looks like this:
<!DOCTYPE html>
<html>
<head>
  <title>User Information App</title>
  <script src="https://ajax.googleapis.com/ajax/libs/jquery/3.5.1/jquery.min.js"></script>
  <link rel="stylesheet" href="https://cdnjs.cloudflare.com/ajax/libs/materialize/1.0.0/css/materialize.min.css">
  <link href="https://fonts.googleapis.com/icon?family=Material+Icons" rel="stylesheet">
</head>
<body>
<div id="content">
  <!-- User information will be displayed here -->
</div>
<script src="https://cdnjs.cloudflare.com/ajax/libs/materialize/1.0.0/js/materialize.min.js"></script>
<script src="app.js"></script>

</body>
</html>
Notice we include libraries (style sheets and JavaScript code) related to Materialize, Material Icons, and jQuery.
Our HTML has a <div> with id="content". This is where most of our page content—managed by the logic in app.js—will go. In app.js, our initial code looks like this:
// Fetch and display list of usernames
function fetchUsers() {
  $.ajax({
    url: 'get_users.php',
    type: 'GET',
    dataType: 'json',
    success: function(users) {
      let html = '<table class="highlight"><thead><tr><th>Usernames</th><th>Action</th></tr></thead><tbody>';
      users.forEach(user => {
        html += `<tr id="user_${user.username}"><td><a href="#" onclick="fetchUserDetails('${user.username}')">${user.username}</a></td>
                         <td><a href="#" onclick="deleteUser('${user.username}')"><i class="material-icons">delete</i></a></td></tr>`;
      });
      html += '</tbody></table>';
      $('#content').html(html);
    },
    error: function() {
      $('#content').html('<p class="red-text">Failed to fetch data.</p>');
    }
  });
}

$(document).ready(function() {
  fetchUsers();
});
When the page loads in the browser, we call fetchUsers(), which sends an Ajax request to call our get_users.php script. When our script returns an array of usernames, the JavaScript populates a table with those usernames, adding the table to our #content div.
Spin up NGINX
We use NGINX to serve up our single-page application. Our NGINX site configuration looks like this:
server {
  listen 80 default_server;
  listen [::]:80 default_server;
  server_name localhost;
  root /home/path/to/my/project;
  index index.html;
  location / {
    try_files $uri $uri/ =404;
  }

  location ~ \.php$ {
    include snippets/fastcgi-php.conf;
    fastcgi_pass unix:/var/run/php/php8.1-fpm.sock;
  }

  location ~ \/.ht {
    deny all;
  }
}
Test the initial page
With NGINX up and running, here is how our page looks in our browser:
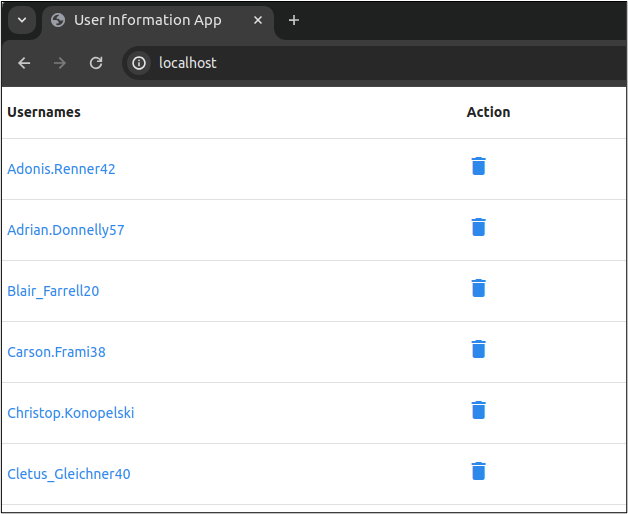
Notice that the usernames are each linked. An onClick handler for each link (see app.js) will call fetchUserDetails(), which we have not yet defined. Similarly, each row has a delete icon. Clicking on the icon calls deleteUser(). We need to write the JavaScript code to handle these two clicks, as well as the backend PHP scripts to handle these requests.
Fetching user details and deleting users
We won’t show the code for the fetchUserDetails() and deleteUser() click handlers in app.js, as it’s quite straightforward. You can see these details in the GitHub repository.
The fetchUserDetails() JavaScript function sends an Ajax request to get_user_details.php. The PHP looks like this:
<?php
include 'db.php';


$username = $_GET['username'];

if (!strlen($username)) {
  http_response_code(400);
  return;
}

$sql = "SELECT first_name, last_name, email FROM users WHERE username=?";
$statement = $conn->prepare($sql);
$statement->bind_param("s", $username);
$statement->execute();
$result = $statement->get_result();
$user = $result->fetch_assoc();
if (!$user) {
  http_response_code(404);
  return;
}

$conn->close();
echo json_encode($user);
Similarly, the deleteUser() JavaScript function sends an Ajax request to delete_user.php, which looks like this:
<?php
include 'db.php';

$_POST = json_decode(file_get_contents('php://input'), true);
$username = $_POST['username'];
if (!strlen($username)) {
  http_response_code(400);
  return;
}

$sql = "DELETE FROM users WHERE username=?";
$statement = $conn->prepare($sql);
$statement->bind_param("s", $username);
$statement->execute();
echo json_encode(['success' => true]);
Adding new users
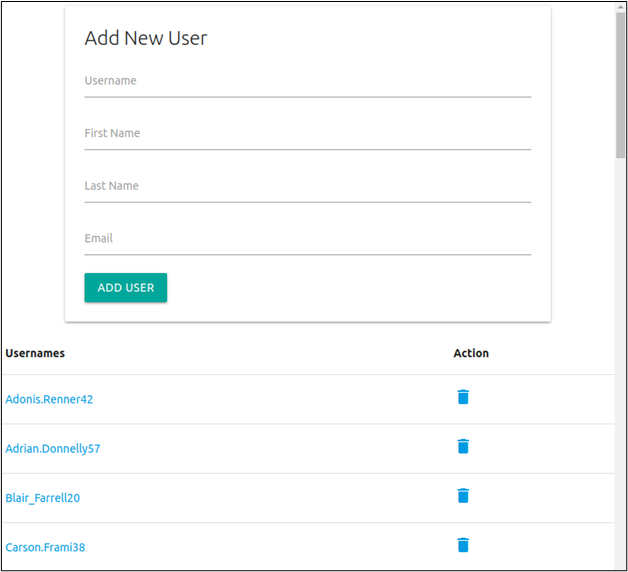
To round out the functionality of our application, we modified index.html, adding a web form for adding a new user. We added a form submission handler in app.js and a PHP script (add_user.php) to handle the backend concerns. The logic for these components is straightforward, so we won’t dive into the details here.
Our final application’s frontend looks like this:
Integrating logging to Loggly
In a production environment, your PHP application won’t be running on your local machine, so you won’t be able to see log statements as events happen. In fact, depending on your cloud provider, you may not even have access to the instance serving up your application to see the logs. This is why it makes sense to centralize logs from this application—and from all your other applications—with a log management service. Across all your applications, you need only turn to a single place for log searching, filtering, and alerting.
Let’s walk through the steps for sending log statements from our PHP application to Loggly.
Install Monolog
We’ll use Monolog to send our PHP logs to Loggly. Monolog is a lightweight, easy-to-use logging library for PHP. It also has a built-in LogglyHandler and LogglyFormatter for easily sending logs to Loggly.
With Monolog installed, we create a logger.php file to initialize our logger.
<?php
include_once 'constants.php';
require __DIR__.'/vendor/autoload.php';
use Monolog\Logger;
use Monolog\Handler\LogglyHandler;
use Monolog\Formatter\LogglyFormatter;
$log = new Logger('user-accounts');
$logHandler = new LogglyHandler(LOGGLY_TOKEN, Logger::INFO);
$log->pushHandler($logHandler);
Add Loggly customer token
Note our logger requires the LOGGLY_TOKEN constant, which we define in constants.php. To get your Loggly customer token, follow these steps:
- Log in to your Loggly account.
- Go to Logs -> Source Setup.
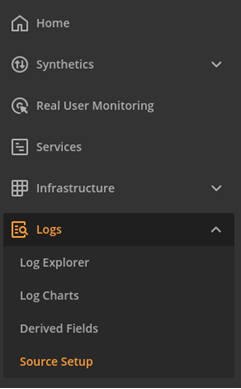
- Navigate to the Customer Tokens page.
- Click the Add New button.
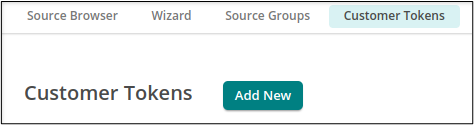
- Provide a description for your token, and then click Save.
- Copy the value for your newly created customer token.
In constants.php, paste in the value for the customer token you just created:
define('LOGGLY_TOKEN', 'REPLACE ME'); Now, we’re ready to add logging statements in any of our PHP scripts.
Add logging statements
For our simplest case, let’s add some logging statements to get_users.php. Our updated file looks like this:
<?php
include 'db.php';
include 'logger.php';
$logHandler->setTag('get_users');

$sql = "SELECT username FROM users ORDER BY lower(username)";
$result = $conn->query($sql);

$rows = array();
while ($row = $result->fetch_assoc()) {
  $rows[] = $row;
}
$log->info("Fetched " . count($rows) . " rows");

$conn->close();
echo json_encode($rows);
We call include ‘logger.php‘, which gives us access to our log handler ($logHandler) and our logger ($log). For any log statements emitted by this file, we tag them with get_users. This will make them easier to filter and find. Then, we call $log->info to emit a log statement at the info log level. We’ll log the number of rows fetched by the query.
In get_user_details.php, we have some other possible code paths, leading to a more interesting logging scenario:
<?php
include 'db.php';
include 'logger.php';
$logHandler->setTag('get_user_details');
$username = $_GET['username'];
if (!strlen($username)) {
  $log->warning("No username provided");
  http_response_code(400);
  return;
}
$log->info("Fetching details for user " . $username);
$sql = "SELECT first_name, last_name, email FROM users WHERE username=?";
$statement = $conn->prepare($sql);
$statement->bind_param("s", $username);
$statement->execute();
$result = $statement->get_result();
$user = $result->fetch_assoc();
if (!$user) {
  $log->warning("Could not find user " . $username);
  http_response_code(404);
  return;
}
$conn->close();
echo json_encode($user);
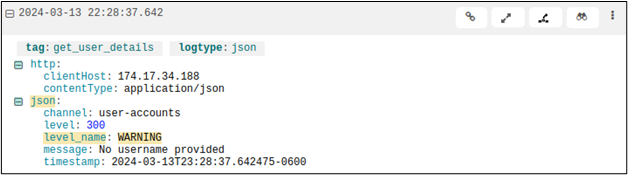
This time, we set the tags for these log statements to be get_user_details. If there is no username in the query parameter, then we emit a log statement with the warning log level. If the database query does not return a user (meaning the provided username was not found in the database), then we emit another warning message.
The logging statements in delete_user.php look like this:
<?php
include 'db.php';
include 'logger.php';
$logHandler->setTag('delete_user');

$_POST = json_decode(file_get_contents('php://input'), true);
$username = $_POST['username'];
if (!strlen($username)) {
  $log->warning("No username provided");
  http_response_code(400);
  return;
}

$log->info("Deleting user " . $username);
$sql = "DELETE FROM users WHERE username=?";
$statement = $conn->prepare($sql);
$statement->bind_param("s", $username);
$statement->execute();
echo json_encode(['success' => true]);
In addition to basic logging statements in add_user.php (not shown here, but you can see details in the codebase), we also wanted to log any database connection errors in db.php:
<?php include_once 'constants.php'; include_once 'logger.php'; $logHandler->setTag('database');try { $conn = new mysqli(DB_HOST, DB_USERNAME, DB_PASSWORD, DB_NAME); } catch (Exception $e) { $error = "Connection failed: " . $e->getMessage(); $log->error($error); die($error);}
View logs in Loggly
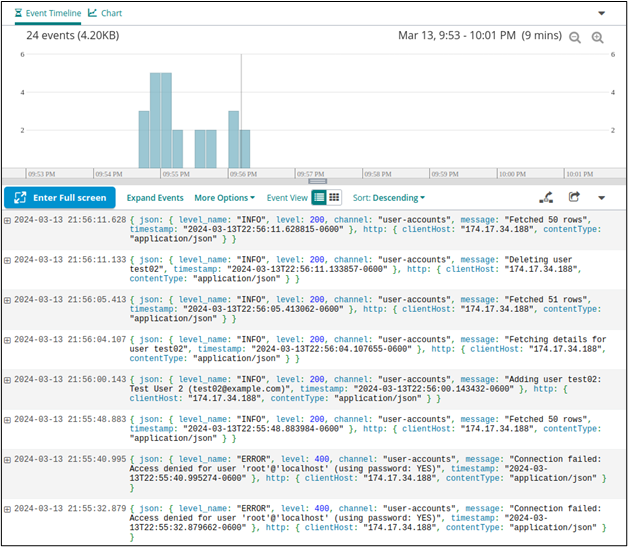
With our application configured to send logs to Loggly, we navigate to the Log Explorer in Loggly. Immediately, we see the most recent log events from our application activity.
Use the Field Explorer to filter by tag
While an overall view of all events is sometimes useful, we may want to filter the results based on certain criteria. Recall that we tagged our log statements according to the PHP file that emitted them. If, for example, we wanted to find all activity related to our delete_user tag, then we would use the Field Explorer to filter the result to only those with tag equal to delete_user.
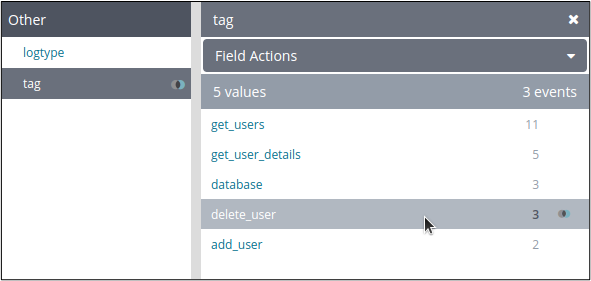
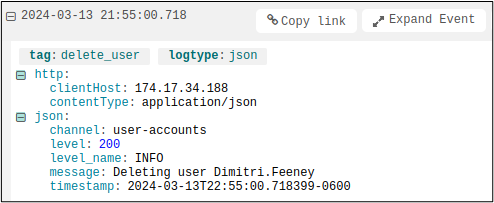
This shows the three log events related to this tag.
When we click on a specific log entry, we can see more details.
Search through logs
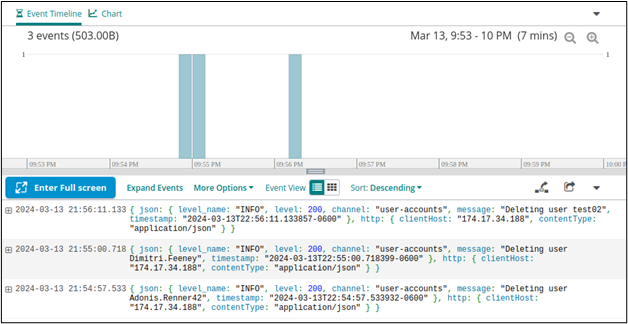
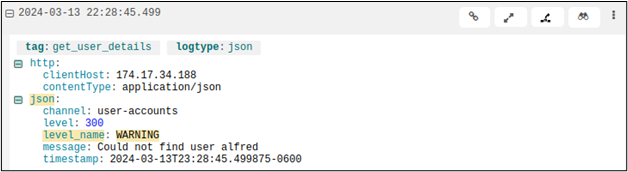
Perhaps we need to look for any log entries that include a specific string. For this, we can use the search bar. For example, we can search for the presence of a specific username across our logs:

The search result shows two entries, one for fetching the user’s details, and another for deleting the user.

Filtering by log level or other JSON fields
By using Monolog’s built-in LogglyHandler and LogglyFormatter, log entry payloads are sent as JSON. This gives us additional fields that we can use in filtering. In the Field Explorer, we can select JSON.
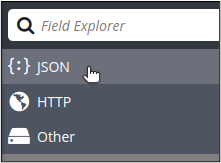
This gives us various JSON fields from the log payload, letting us drill down deeper.
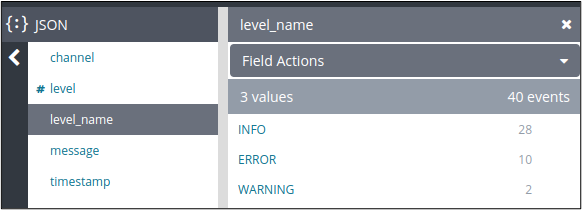
We set the channel (to user-accounts) when we initialized our logger in logger.php. For our demonstration, all of our logging statements are set to the user-accounts channel. One strategy is to use a different channel for each application, as an additional way to facilitate targeted filtering and searching.
level and level_name are both related to the log level, either by numerical value or by name, respectively. We see that we have 10 ERROR level log events and 2 WARNING level log events.
Upon further inspection, we see the errors were related to invalid database credentials.
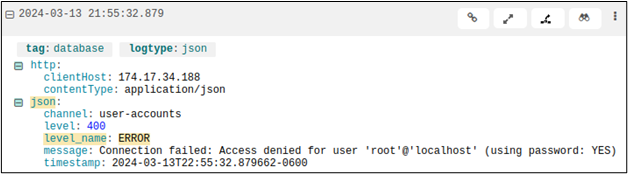
Meanwhile, the warnings were related to some bad calls to get_user_details.php.
Loggly provides a rich set of easy-to-use features to make the most of your logs. In addition, to search and filtering, you can build powerful dashboards and visualizations for better management and analysis. You can also set up alerts to notify you when specific criteria related to incoming log events are met.
Conclusion
In this demonstration, we’ve walked through how to build a simple, MySQL-backed PHP single-page application. We integrated logging into our application, using Monolog to send our log events seamlessly to Loggly. With Loggly, we have access to powerful log querying and analysis capabilities.
Loggly can help you unify and centralize your logs, not only for your PHP application but across all your applications and infrastructure. Nearly all popular programming languages and frameworks have SDKs or packages for seamless logging integration with Loggly.
When you’re ready to get started with Loggly, sign up for a free account today!
The Loggly and SolarWinds trademarks, service marks, and logos are the exclusive property of SolarWinds Worldwide, LLC or its affiliates. All other trademarks are the property of their respective owners.

Loggly Team