Logging to Loggly from Go with Logrus and Logrusly
Introduction
Go is an exciting and relatively new language from Google (v1 was released in March, 2012, so it’s about 3.5+ years old as of this blog post). Let’s look at implementing a solid logging solution to complement its speed and efficiency. In this blog post, we’ll examine the popular logrus library and use it with the logrusly hook to connect our Golang code with Loggly.com’s servers for log analysis.
You can run a set of tests against any Go project hosted on GitHub using the Go Report Card:
- A+: https://goreportcard.com/report/Sirupsen/logrus
- A+: https://goreportcard.com/report/sebest/logrusly
![]() We’ll be using Go version 1.5.1, released in September, 2015 for this blog post, with the latest version of Logrus and Logrusly. You can check which version of Go is installed on your system with the command `go version`:
We’ll be using Go version 1.5.1, released in September, 2015 for this blog post, with the latest version of Logrus and Logrusly. You can check which version of Go is installed on your system with the command `go version`:
Localhost:
This example output shows the version of Go on OSX where we’re developing our example code. When it comes time to run on your server, make sure you’re running the same version on both local and remote servers to avoid surprises.
Audience and Scope
We’ll assume you’ve been exposed to the basic syntax of Go, and that you’ve run through the hello-world at https://tour.golang.org/ and taken a bit of the tour. Knowledge of how Go handles JSON is a plus, but the code we’ll be working with handles that for us under the hood. You’ll need a free Loggly.com account to catch the data we’ll be sending. If you’re new to running Go on a server, the Environment section below will be helpful in getting set up. If you’re a seasoned Go professional, you may wish to skip directly to the example code.
Environment
Go is available for free under the BSD open source license. Although Golang runs on numerous platforms (one of its many flexible features), we’ll pick just one, and for our particular examples we’ll deploy on a fresh FreeBSD 10.2 droplet on DigitalOcean, installing Go from the downloads found here: https://golang.org/dl/. Connecting to the droplet with `ssh freebsd@your.ip.address.here`, we can install and configure our environment. (Note: Don’t type the > character at the beginning of the line; that represents the default tcsh prompt.)
FreeBSD Server:
If you’d like installation instructions for other systems, check out the official Golang docs: https://golang.org/doc/install
Our Example Code
If you’d like to play directly with the code example given in this article, you may simply pull in just our example files from GitHub: https://github.com/DavidLiedle/loggly-blog-go-logrus-logrusly
With a copy of the example files in place, you might be tempted to pull down the imported libraries and compile the file in place using `go build go-logrusly.go` and then `./go-logrusly`, or to just run it directly with `go run go-logrusly.go`. However, this is not the idiomatic Go way to do things. If you’re up for it, go ahead and set up your environment according to best practices by following along with the Configuration section below. (Here’s a hint: Go offers its own built-in workflow for downloading and using GitHub.com projects and keeps them in a special directory on your system. In fact, that’s one of its unique and attractive features, and worth getting to know as you work in Go.)
Please note that this example code is intended to be run as a standalone proof-of-concept and not to be included in your project as an import. To be clear, you’re welcome to use the code by cutting and pasting bits of it that you find useful; just don’t expect good results if you add an import “github.com/DavidLiedle/loggly-blog-go-logrus-logrusly” line to your source! (So don’t do it.) Just use the example code to check out how this example project makes use of the logrusly hook, and then create your own.
Configuration
With Go installed and configured, we’re ready to use `go get` and `go install` to pull in our code. To begin, let’s get the project set up in a manner such that the go-logrusly.go file is in a folder called $GOPATH/src/github.com/DavidLiedle/loggly-blog-go-logrus-logrusly/ by entering the following commands:
Localhost Environment AND FreeBSD Server:
With the loggly-blog-go-logrus-logrusly project installed, a compiled executable is placed in $GOPATH/bin/ and it is ready to execute! You’ll need to edit the code to insert your Loggly.com customer token before it will behave as desired. This presents a bit of a head-scratcher with Go’s self-referencing idiom. You’ve pulled down an active Git repository, and you’re making an edit and saving the file. Now you’re out of sync with the master branch of the source repo! There are several ways to handle the situation.
We could create a file to store our Loggly information, and gitignore that file. (That’s probably the cleanest approach.) We could edit the loggly-blog-go-logrus-logrusly project and just never, ever ever get back together with its upstream source (the “Taylor Swift” approach). Or we could fork the project on GitHub and do all-the-things to our own copy (the open source approach), being careful not to commit sensitive information back up to the world. For this blog post, we’ll take the Swift approach and let you pop open the file in a text editor to insert your Loggly credentials. We’ll do this on both our localhost and on the server.
Editing Our Example go-logrusly.go File on the Server
FreeBSD is a great Operating System, but it could use a good text editor. The same thing can be said of Emacs, so we’ll install that:
FreeBSD Server:
Now let’s pop open the go-logrusly.go file and add our personal customer token. If you need a free Loggly.com account, check out the Loggly.com Setup section at the end of this post. By keeping a source copy of our code on the server, we can compile directly to the server’s architecture to ensure that the statically linked binary we’ll run works as intended in production. You may prefer to experiment with cross-compiling your code from your localhost, but mileage may vary.
Using logrusly
To implement the logrusly hook, we import the Logrus package and the Logrusly package at the top of our code:
Filename: go-logrusly.go
Let’s break it down. First, we identify our file with the main package because this is our final form and we’re not planning on getting imported again after this file is a wrap. Next we import the logrus and logrusly packages:
- logrus: Go code that helps us with logging in Go
- logrusly: The hook that connects Logrus to Loggly
Before we can make use of these external resources, we need to `go get` them. This process pulls the code down from GitHub and places it inside of Go’s configured directory for source files, aptly named “src”. Compiled libraries store their output in the “pkg” folder, under a folder named after the architecture for which they have been compiled.
FreeBSD Server AND Localhost:
Success is silent. On the author’s OSX system as configured (with ~/go as the $GOPATH), this results in the following additions to localhost:
Localhost (OSX 10.11.1):
A Walkthrough of the Code
While not the first thing defined in the go-logrusly.go file, func main() is the one that kicks things off when the program first runs. A new logrus is created and assigned to the variable “log”. A new hook is defined, and we’ve edited the code to properly send data off to Loggly. The hook is added to logrus, and we’re ready to log. We define our fields (“name” and “age”), and an error message (“Hello Dent, Arthur Dent!”). Because this is not a panic or fatal log level, we manually call Flush() and the log entry is shipped off to the Loggly.com server. If we’ve got the correct Customer Token associated with our account, we’ll see the entry show up in our Loggly.com dashboard (sometimes after a short delay): 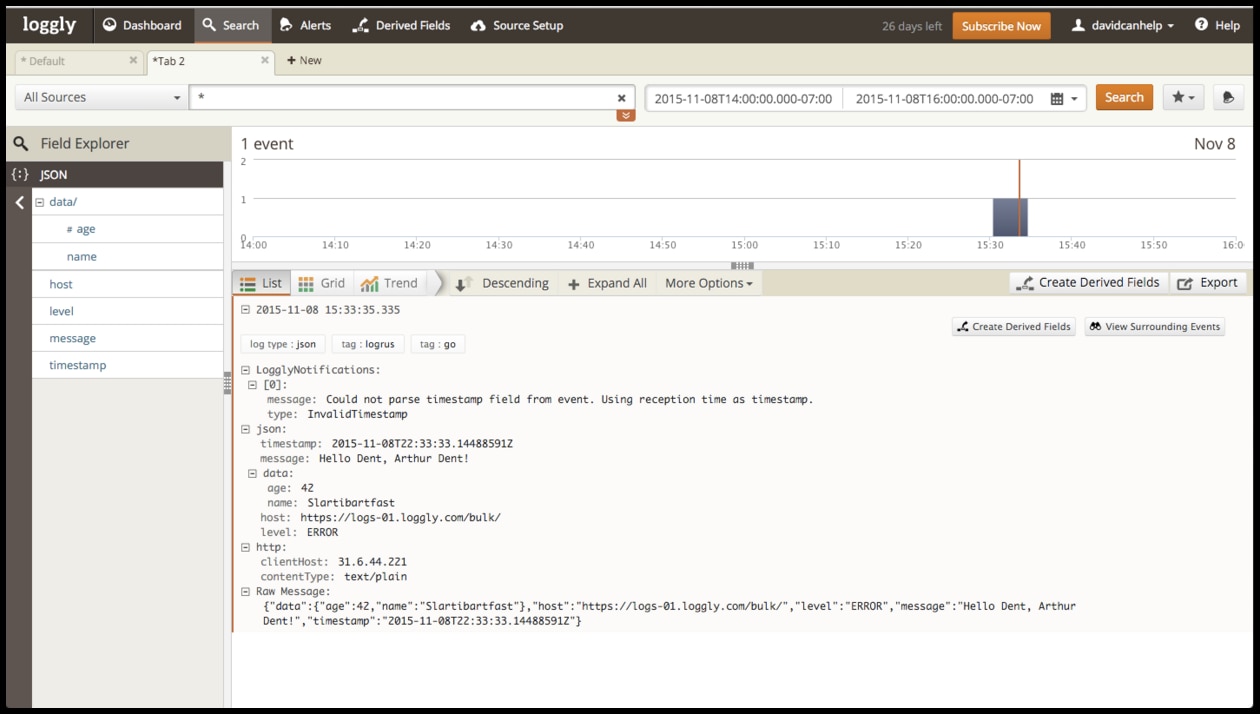
Real-World Usage
There are several ways to successfully run Go code, which can lead to a bit of confusion. We could simply execute the file with our credentials swapped in:
Localhost AND FreeBSD Server:
…which is great for testing changes to our code during development.
Or, if you’d rather compile:
Localhost AND FreeBSD Server:
...which creates a statically linked binary. Or, to do things the Go Way, we can install the package and run it:
Localhost AND FreeBSD Server:
…which compiles a statically linked binary AND places it in our system’s default location for compiled Go programs.
That’s great for a quick test, but what if we want our program to keep running? Obviously the purpose of a server is to serve, not to sit dormant and run occasionally when we run off a quick command on the terminal. If we want our script to run continuously, we need to adopt a more robust solution than just running the code and walking away.
There are several approaches we can take. By executing a background command, we can detach the running process from our flow of commands on the terminal:
FreeBSD Server:
Or we could use the rc system to manage:
FreeBSD Server:
Deployment is a rapidly growing area of focus in the industry, with tools like PM2 (famous for Node.js, but useful with many languages), Supervisor, and Docker garnering much attention. However you choose to run your code, remember that it can only log while it is running!
Running Our Code
Here’s our checklist of all-the-things to make sure we’re ready to execute code:
- Is Go properly installed and configured (localhost and remote)?
- Do we have a copy of the example code (either downloaded, hand-typed to reproduce, or retrieved with `go get`?)
- Do we have our unique Loggly token? Did we insert it into the example file and save?
- Are we happy with the filenames, paths, and configuration options we’ve set in our code?
Loggly.com Setup
See our article on logging setup if you need to configure your Loggly account to receive logs. Loggly’s servers will accept data sent to the http endpoints with your customer token. Once the log data is in Loggly’s system, there are numerous powerful features you can use to gain insight into what is happening in your project. Loggly offers several resources to learn more and get help:
- https://www.loggly.com/docs/basics-of-sending-data/
- technicalsupport@solarwinds.com (Contact Support)
Conclusion
We’ve examined how to properly install and run Logrus and Logrusly in our Go code, how to configure and make use of the library and its hook, and how to properly execute and deploy our code in an idiomatic Go manner, sending logging data off to Loggly.com for digest. You can now build out a complete logging system to keep an eye on your Go programs.
Happy logging!
Additional Reading: Think Differently About What to Log in Go: Best Practices Examined »
The Loggly and SolarWinds trademarks, service marks, and logos are the exclusive property of SolarWinds Worldwide, LLC or its affiliates. All other trademarks are the property of their respective owners.

David Liedle

